Wire A 220 Volt Outlet For Window Air Conditioner: Expert Guide
To wire a 220-volt outlet for a window air conditioner, shut off the power. Connect the wires to the appropriate terminals.
Installing a 220-volt outlet for a window air conditioner ensures your appliance runs efficiently and safely. This process involves shutting off the main power supply to avoid electrical hazards. Carefully connect the wires to the correct terminals following the manufacturer’s guidelines.
Verify that you have the correct gauge wire and a compatible circuit breaker. An incorrect installation can lead to serious electrical issues. Make sure to double-check your connections and secure the outlet properly. For those unfamiliar with electrical work, consulting a licensed electrician is advisable for safety and compliance with local codes.
Credit: www.reddit.com
Tools And Materials
Wiring a 220-volt outlet for a window air conditioner requires specific tools and materials. This guide will walk you through what you need to complete this task. Having the right tools and materials ensures a safe and efficient installation.
Essential Tools
To wire a 220-volt outlet, you need the following essential tools:
- Wire Strippers: Used to strip the insulation from the wires.
- Voltage Tester: Ensures the power is off before working.
- Drill: Makes holes for screws and anchors.
- Screwdrivers: Tightens and loosens screws.
- Pliers: Bends and twists wires.
- Measuring Tape: Measures distances accurately.
- Utility Knife: Cuts wires and insulation.
Required Materials
Gather the necessary required materials for the installation:
- 220-Volt Outlet: The outlet for the air conditioner plug.
- Electrical Box: Houses the outlet and wiring.
- 220-Volt Circuit Breaker: Protects the circuit from overload.
- Electrical Wire: Conducts electricity to the outlet.
- Wire Nuts: Connects and secures wires together.
- Electrical Tape: Insulates and protects wire connections.
- Screws and Anchors: Secures the outlet and box in place.
With these tools and materials, you are ready to start wiring your 220-volt outlet. Ensure you follow all safety guidelines and local electrical codes.
Safety Precautions
Wiring a 220-volt outlet for a window air conditioner requires careful attention. Safety precautions are essential to avoid accidents and ensure a smooth installation.
Turn Off Power
Before starting, locate your home’s main electrical panel. Switch off the circuit breaker that controls the area where you’ll work. This step is crucial to prevent electrical shocks. Use a voltage tester to confirm there is no power flowing.
Never rely on just flipping a switch. Always double-check that the power is off. This ensures your safety throughout the installation.
Use Protective Gear
Wear protective gear such as gloves and safety glasses. These items protect your hands and eyes from potential hazards.
Additionally, use insulated tools. Insulated tools reduce the risk of electrical shocks. Always keep your workspace dry and free from any conductive materials.
| Protective Gear | Purpose |
|---|---|
| Gloves | Protect hands from cuts and shocks |
| Safety Glasses | Protect eyes from debris and sparks |
| Insulated Tools | Prevent electrical shocks |
Following these safety precautions ensures a safer installation process. Always prioritize safety to avoid accidents and injuries.
Choosing The Right Outlet
Setting up a window air conditioner needs the right outlet. This ensures your unit runs safely and efficiently. Let’s explore the key factors.
Outlet Types
There are different outlet types for 220-volt air conditioners. The two main types are:
- Standard 220-Volt Outlet: These outlets are common in most homes.
- Dedicated 220-Volt Outlet: These are used for heavy-duty appliances.
Choosing the right outlet type is crucial. A standard outlet might not handle the load.
Voltage Requirements
Understanding voltage requirements is essential. A window air conditioner needs a specific voltage.
Here’s a simple table to help you understand:
| Appliance | Voltage Requirement |
|---|---|
| Small Window AC | 110-120 Volts |
| Large Window AC | 220-240 Volts |
Ensure your outlet matches the voltage of your air conditioner. A mismatch can cause issues.
Also, check the ampere rating of your outlet. It should support the air conditioner’s load.
In summary, choosing the right outlet ensures safety and efficiency.

Credit: www.youtube.com
Preparing The Installation Area
Before installing a 220-volt outlet for your window air conditioner, you need to prepare the installation area. This step ensures safety and efficiency. Proper preparation also prevents costly mistakes. Follow these steps carefully to set up your installation area.
Locate The Studs
First, you need to locate the studs in your wall. Use a stud finder for this task. Run the stud finder along the wall until it beeps. Mark the spot with a pencil. Studs provide a secure place to mount the electrical box.
Repeat this process to find more studs. Mark each stud you find. This helps you see the overall structure of the wall. Knowing the stud locations is crucial for a safe installation.
Measure And Mark
Now, it’s time to measure and mark the exact spot for the outlet. Use a tape measure for accurate measurements. Measure the height from the floor where you want the outlet. A common height is about 12 inches from the floor.
Next, mark the spot where the center of the outlet will be. Use a level to ensure your marks are straight. This ensures the outlet will be level when installed.
Double-check your measurements before proceeding. Accurate measurements prevent errors and rework. Properly marked spots guide the installation process.
Wiring The Outlet
Wiring a 220-volt outlet for a window air conditioner might seem daunting. With careful steps, it becomes manageable. This guide covers connecting wires and securing the outlet. Follow each step to ensure a safe installation.
Connecting Wires
Begin by turning off the power at the main breaker. This is crucial for safety. Next, gather your tools and materials:
- Wire stripper
- Screwdriver
- 220-volt outlet
- Electrical tape
- Wire nuts
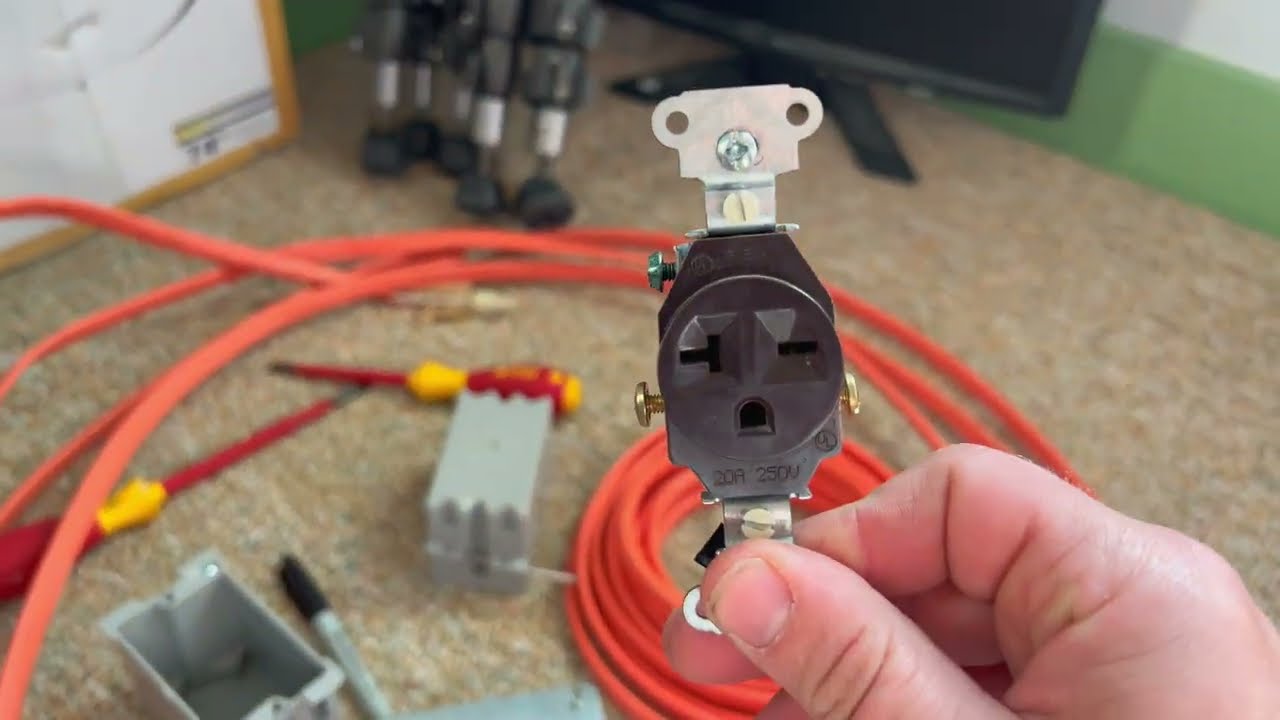
Strip the insulation from the ends of each wire. You should have three wires: black, red, and green or bare. Connect the black wire to the brass terminal. Connect the red wire to the other brass terminal. Finally, connect the green or bare wire to the green terminal.
Securing The Outlet
Place the wires neatly inside the electrical box. Carefully push the outlet into the box. Use screws to secure the outlet to the box. Tighten the screws until the outlet is firm. Finally, attach the outlet cover plate. Ensure it fits snugly.
Switch the power back on at the breaker. Test the outlet with a voltage tester. Ensure the outlet works correctly. Your 220-volt outlet for the window air conditioner is now ready.
Installing The Circuit Breaker
Installing a circuit breaker is crucial for safely wiring a 220-volt outlet for your window air conditioner. It ensures your system has adequate protection from electrical faults. Here’s a comprehensive guide to help you install the circuit breaker.
Breaker Types
Choosing the right breaker type is essential. There are two main types: single-pole and double-pole. A 220-volt outlet requires a double-pole breaker. This type connects to both 120-volt hot wires, providing the necessary 220 volts.
Single-pole breakers are not suitable. They are designed for 120-volt circuits and won’t provide enough power. Always opt for a double-pole breaker for 220-volt systems.
Proper Installation
Follow these steps to properly install a double-pole breaker:
- Turn off the main power supply.
- Remove the panel cover carefully.
- Identify the neutral and ground bus bars.
- Install the double-pole breaker into an empty slot.
- Connect the white wire to the neutral bus bar.
- Connect the ground wire to the ground bus bar.
- Attach the two hot wires to the breaker terminals.
- Replace the panel cover securely.
- Turn on the main power supply.
Ensure all connections are tight and secure. Loose connections can cause electrical hazards.
| Step | Description |
|---|---|
| 1 | Turn off the main power supply |
| 2 | Remove the panel cover carefully |
| 3 | Identify the neutral and ground bus bars |
| 4 | Install the double-pole breaker into an empty slot |
| 5 | Connect the white wire to the neutral bus bar |
| 6 | Connect the ground wire to the ground bus bar |
| 7 | Attach the two hot wires to the breaker terminals |
| 8 | Replace the panel cover securely |
| 9 | Turn on the main power supply |
Double-check all connections. Ensure there are no loose wires. A secure connection is vital for safety.
Testing The Installation
After wiring a 220-volt outlet for your window air conditioner, it’s crucial to test the installation. This ensures safety and proper functionality. Here’s a step-by-step guide to testing the installation effectively.
Using A Multimeter
A multimeter is an essential tool for this task. It helps verify voltage and continuity. Follow these steps to use a multimeter:
- Set your multimeter to the voltage setting.
- Insert the probes into the outlet slots.
- Check the reading. It should show around 220 volts.
Ensure the multimeter is functioning correctly. Double-check the settings before testing. This guarantees accurate readings and safety.
Checking For Issues
After verifying the voltage, inspect for potential issues. This involves checking the wiring and outlet itself. Here are some steps to follow:
- Loose Wires: Ensure all wires are securely connected.
- Burn Marks: Look for any scorch marks or discoloration.
- Overheating: Feel the outlet for unusual warmth.
Address any problems immediately. If unsure, consult a professional electrician. Safety should be your top priority during this process.
Testing the installation is a critical step. Proper testing ensures your window air conditioner operates safely and efficiently.
Final Steps
After wiring a 220-volt outlet for your window air conditioner, the final steps are crucial. These steps ensure your air conditioner is securely mounted and operates efficiently.
Mounting The Air Conditioner
Once the outlet is wired, it’s time to mount the air conditioner. Start by checking the manufacturer’s instructions for specific mounting guidelines. Each model might have unique requirements.
Use a sturdy bracket to support the air conditioner. Ensure the bracket is level and can hold the unit’s weight. Secure the bracket to the window frame using screws.
Slide the air conditioner into the window opening. Align it with the bracket, ensuring it sits securely. Close the window sash to hold the unit in place.
Seal any gaps around the air conditioner with foam insulation. This keeps the cool air in and the hot air out.
Ensuring Proper Operation
Plug the air conditioner into the 220-volt outlet. Turn on the unit to check if it powers up correctly. Listen for any unusual noises.
Set the thermostat to your desired temperature. Allow the air conditioner to run for a few minutes. Ensure it cools the room effectively.
Check the air filter for cleanliness. Clean or replace the filter if needed. A clean filter ensures efficient operation.
Inspect the unit’s drainage system. Make sure it drains properly to avoid water buildup.
Finally, use a voltage tester to confirm the outlet delivers the correct voltage. This step ensures the air conditioner receives the proper power.

Credit: www.pinterest.com
Frequently Asked Questions
What Size Wire For 220 Volt Window Air Conditioner?
For a 220-volt window air conditioner, use a 12-gauge wire. This ensures safe and efficient operation.
How To Wire A 220v Plug With 3 Wires?
To wire a 220V plug with 3 wires, connect the black wire to one brass terminal, the red wire to the other brass terminal, and the green wire to the green terminal. Ensure all connections are tight and secure.
Can You Plug A Window Air Conditioner Into A Regular Outlet?
Yes, you can plug a window air conditioner into a regular outlet. Ensure the outlet matches the unit’s voltage and amperage requirements.
Conclusion
Installing a 220-volt outlet for your window air conditioner boosts efficiency and comfort. Follow safety guidelines to ensure proper installation. A well-installed outlet ensures your air conditioner runs smoothly. Always consult a professional if you’re unsure about electrical work. Enjoy a cooler, more comfortable home with a reliable setup.