How To Remove Front Cover Of GE Window Air Conditioner: Step-by-Step Guide
To remove the front cover of a GE window air conditioner, first, unplug the unit. Then, locate and unscrew the front panel screws.
Removing the front cover of your GE window air conditioner is essential for maintenance and cleaning. Over time, dust and debris can accumulate, affecting the unit’s efficiency and performance. Regular cleaning ensures optimal airflow and extends the air conditioner’s lifespan.
This task is straightforward and can be done with basic tools. Make sure to handle the cover carefully to avoid damaging any components. By keeping your unit clean, you ensure a cooler, more comfortable living space and lower energy bills. Following these steps will help maintain your air conditioner in top working condition.
Credit: www.hunker.com
Tools And Materials Needed
Removing the front cover of a GE window air conditioner requires specific tools and materials. Ensuring you have everything ready simplifies the process. Here’s what you need:
Essential Tools
- Screwdriver Set: Both flathead and Phillips screwdrivers.
- Needle-Nose Pliers: For handling small components.
- Putty Knife: Helps in prying the cover gently.
- Flashlight: Illuminates hard-to-see areas.
Required Materials
- Cleaning Cloth: To wipe dust and debris.
- Replacement Screws: In case any screws are damaged.
- Manual: The air conditioner manual for reference.
| Tool | Purpose |
|---|---|
| Screwdriver Set | Removing and securing screws |
| Needle-Nose Pliers | Handling small parts |
| Putty Knife | Prying the cover |
| Flashlight | Lighting up dark areas |
Having these tools and materials at hand ensures a smooth removal process. Always refer to your unit’s manual for any specific instructions or warnings.

Credit: www.youtube.com
Safety Precautions
Removing the front cover of a GE window air conditioner requires attention to safety precautions. This ensures you avoid accidents and damage to the unit. Follow these steps to keep yourself safe.
Power Off
Before starting, turn off the air conditioner. Unplug it from the power source. This step prevents any electrical hazards.
Use a flashlight to see if it is fully off. Double-check the power switch to ensure safety.
Protective Gear
Wear protective gloves and safety goggles to protect yourself. Gloves help avoid cuts from sharp edges. Goggles protect your eyes from debris.
Consider using a dust mask. It helps you avoid inhaling dust and particles.
| Gear | Purpose |
|---|---|
| Gloves | Protects hands from cuts |
| Goggles | Protects eyes from debris |
| Dust Mask | Prevents inhaling dust |
Keep a first aid kit nearby. It’s useful for minor injuries. Ensure the area is well-lit. This helps you see and avoid accidents.
Follow these safety steps to remove the front cover safely.
Prepare The Work Area
Before removing the front cover of your GE window air conditioner, it’s important to prepare the work area. This ensures safety and efficiency. Follow these steps to get started.
Clear The Space
Make sure the area around the air conditioner is clear. Move any furniture, toys, or obstacles. This will give you enough room to work. A clean space also prevents accidents.
- Remove nearby items
- Clear the floor
- Ensure good lighting
Gather Supplies
Before you start, gather the necessary supplies. This will make the process smoother. Here are the tools you’ll need:
| Tool | Purpose |
|---|---|
| Screwdriver | Remove screws |
| Soft cloth | Clean the unit |
| Bucket | Hold screws |
| Gloves | Protect your hands |
Having these supplies ready will save you time. You won’t need to search for tools mid-task.
Locate The Screws
To remove the front cover of a GE window air conditioner, you first need to locate the screws. This step is crucial to ensure you don’t damage the unit. Screws hold the front cover in place and keep it secure. Knowing where to find them will make the process easier and quicker.
Identify Screw Locations
First, you need to identify the screw locations. These screws are usually near the front edges of the unit. They could be hidden under a decorative strip or panel. Carefully look around the edges and corners. Use a flashlight if needed to spot them.
Here are some common places to check:
- Top corners of the front panel
- Bottom edges of the unit
- Behind any removable filters or vents
Make sure you don’t miss any screws. Missing one could make the cover hard to remove.
Types Of Screws
Next, you need to know the types of screws used in your GE window air conditioner. Most units use standard Phillips head screws. Some might use flathead or Torx screws.
Here’s a quick table to help you identify them:
| Type of Screw | Description |
|---|---|
| Phillips Head | Cross-shaped slot, common in most units |
| Flathead | Single straight slot, less common |
| Torx | Star-shaped slot, rare but possible |
Use the right screwdriver for the job. This helps prevent stripping the screws. Always turn the screwdriver counterclockwise to loosen them. Keep the screws safe, as you will need them to reattach the cover later.
By understanding where to locate the screws and the types involved, you can easily remove the front cover of your GE window air conditioner. This task becomes straightforward and hassle-free.
Remove The Screws
Removing the front cover of a GE window air conditioner may seem tricky. By following a few simple steps, you can easily remove the screws and access the internal components. This guide will walk you through the process.
Proper Techniques
First, unplug the air conditioner from the power source. This ensures safety. Next, locate the screws that hold the front cover. They are usually near the edges. Use a screwdriver that fits well into the screw heads. Turn the screwdriver counterclockwise to loosen each screw. Apply steady pressure to avoid stripping the screws.
Store Screws Safely
Once you have removed the screws, store them in a safe place. Use a small container or a magnetic dish. Keeping the screws organized ensures you won’t lose them. Label the container if necessary. This helps during reassembly.
- Unplug the air conditioner
- Locate the screws
- Use the correct screwdriver
- Turn counterclockwise to remove screws
- Store screws in a safe place
| Step | Action |
|---|---|
| 1 | Unplug the unit |
| 2 | Locate screws |
| 3 | Use correct screwdriver |
| 4 | Remove screws |
| 5 | Store screws safely |
By following these steps, you ensure a smooth process. Removing the front cover of your GE window air conditioner will be easy and safe.
Detach The Front Cover
Removing the front cover of a GE window air conditioner is simple. Follow these steps to ensure you do it safely and efficiently.
Lift Carefully
First, locate the screws on the front cover. Use a screwdriver to remove them. Place the screws in a safe spot. Gently lift the cover upwards. Do not use too much force. The cover should come off easily.
Avoid Damaging Clips
Many GE air conditioners have plastic clips. These clips hold the cover in place. Be cautious with these clips. Do not pull the cover too hard. You could break the clips. Lift the cover gently to avoid damage. If the cover resists, check for hidden screws.
| Step | Action |
|---|---|
| 1 | Locate and remove screws |
| 2 | Lift the cover upwards carefully |
| 3 | Avoid breaking the plastic clips |
Follow these steps to remove the front cover safely. Keep your air conditioner in good condition.
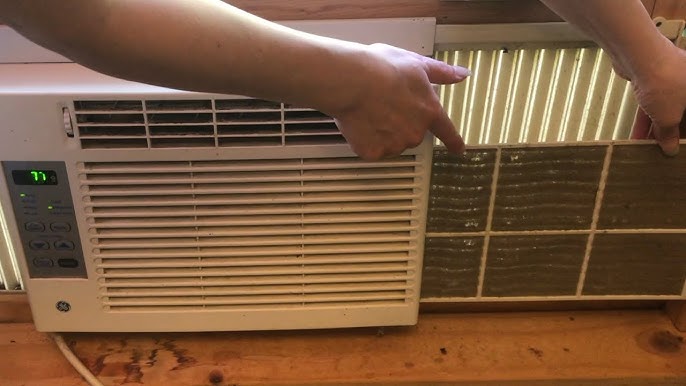
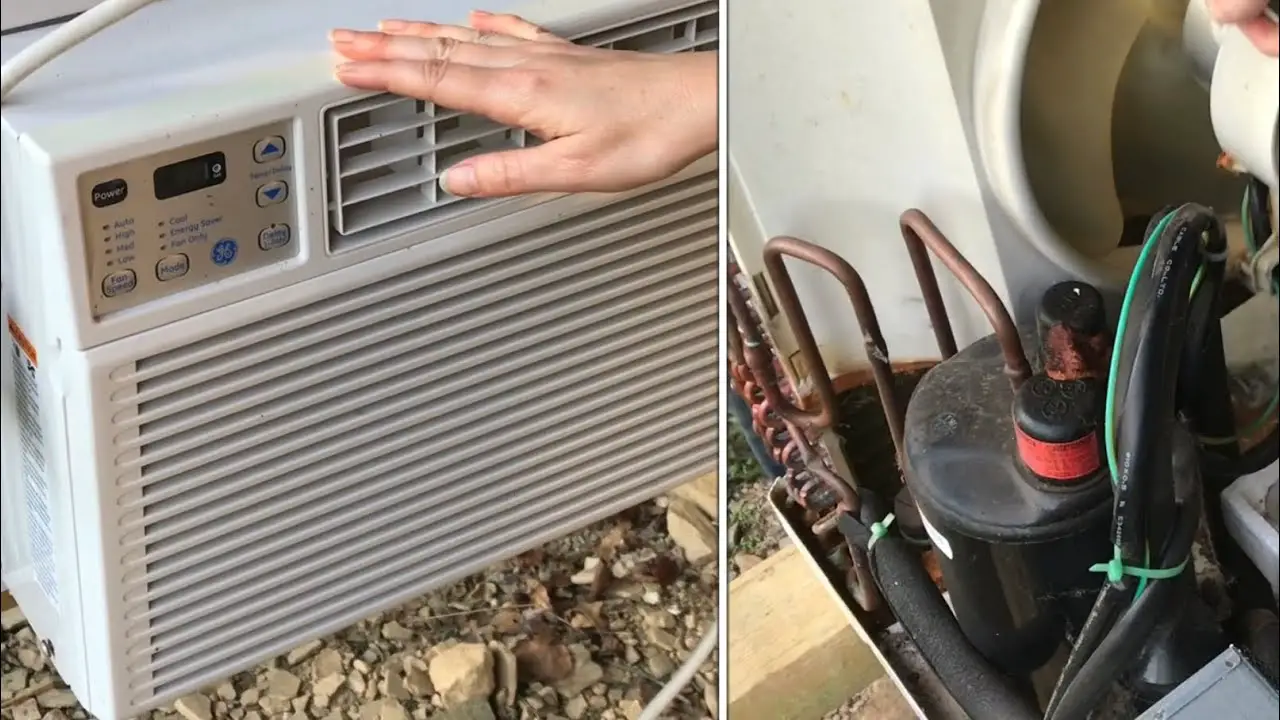
Inspect And Clean
Inspecting and cleaning your GE window air conditioner is crucial. It ensures optimal performance and extends the unit’s lifespan. Follow these steps to inspect and clean the front cover of your GE window air conditioner.
Check For Dust
First, turn off and unplug the air conditioner. This ensures safety while you inspect. Carefully remove the front cover by unscrewing or unclipping it. Look for dust and dirt on the cover and components.
Use a flashlight to inspect hidden areas. Dust buildup affects airflow and efficiency. Pay attention to the air filter, coils, and vents. Dust on these parts can reduce cooling capacity.
Clean Components
Start with the air filter. Remove it and clean using a vacuum or soapy water. Let it dry completely before reinstalling. Clean the coils with a soft brush or cloth. Avoid using harsh chemicals as they can damage the coils.
Wipe the front cover and vents with a damp cloth. Ensure all components are dust-free. Reattach the front cover securely. Plug the air conditioner back in and test its performance.
Regular inspection and cleaning keep your air conditioner running efficiently. This simple maintenance can save energy and reduce costs.

Credit: www.reddit.com
Reattach The Front Cover
Once you have cleaned or serviced your GE window air conditioner, it’s time to reattach the front cover. This step is crucial to ensure your unit operates efficiently. Follow these simple steps to align and secure the front cover properly.
Align Properly
First, hold the front cover in both hands. Ensure it is facing the right direction. Align the cover with the unit’s edges. Make sure it fits snugly without gaps. Double-check the alignment to avoid improper fitting.
Secure Screws
Next, take the screws you removed earlier. Insert them into their designated holes. Use a screwdriver to secure the screws tightly. Make sure all screws are in place and tightened. This prevents the cover from falling off.
By following these steps, you ensure the front cover is reattached securely. This helps maintain the efficiency and longevity of your GE window air conditioner.
| Step | Description |
|---|---|
| Align Properly | Ensure the cover is aligned with the unit’s edges. |
| Secure Screws | Insert and tighten the screws to hold the cover in place. |
Frequently Asked Questions
How Do You Clean The Front Coils On A Window Air Conditioner?
Unplug the unit. Remove the front panel. Use a soft brush to clean dust. Vacuum gently. Reassemble the parts.
How Do You Clean The Coils On A Ge Window Air Conditioner?
Turn off and unplug the unit. Remove the front panel. Use a soft brush to clean the coils gently. Vacuum any debris. Reassemble the unit.
How Do I Clean The Filter On My Ge Window Air Conditioner?
To clean your GE window air conditioner filter, unplug the unit. Remove the filter, wash with warm, soapy water, rinse, and let dry. Reinstall the filter and plug the unit back in. Clean monthly for optimal performance.
Conclusion
Removing the front cover of a GE window air conditioner is straightforward with the right steps. Follow safety guidelines and ensure the unit is unplugged. Clean and maintain your air conditioner regularly for optimal performance. Regular maintenance can extend the life of your appliance and keep your home cool efficiently.